
983 lines
No EOL
39 KiB
Markdown
983 lines
No EOL
39 KiB
Markdown
# Linux
|
||
|
||
- File structure
|
||
|
||
bin: executables
|
||
|
||
sbin: system binaries and require root
|
||
|
||
lib: bin and sbin store common libraries
|
||
|
||
usr → bin: non essential installed binaries
|
||
|
||
usr → local → bin : locally compiled, its separate to stop conflict when installed from apt,snap,etc.
|
||
|
||
etc(editable text configuration): contains config files, executables for booting and log files
|
||
|
||
home: contains data of all users
|
||
|
||
boot: for booting linux kernel
|
||
|
||
- GUI Resource Manager
|
||
|
||
Stacer
|
||
|
||
[stacer_1.1.0+ds-1_amd64.deb](../../_resources/stacer_1.1.0ds-1_amd64.deb)
|
||
|
||
[bleachbit_4.4.2-1_all.deb](../../_resources/bleachbit_4.4.2-1_all.deb)
|
||
|
||
- Uninstalling
|
||
|
||
```bash
|
||
sudo apt-get remove heroku-toolbelt
|
||
```
|
||
|
||
When you remove a package in Ubuntu, the packaged data is removed, but it may leave small, modified user configuration files. This is intentional because if you install the same program again, it would use those configuration files.
|
||
|
||
If you want to remove it completely, you can use apt purge command. You can use it instead of apt remove command or after running the apt remove command.
|
||
|
||
```
|
||
sudo apt purge program_name
|
||
```
|
||
|
||
command that cleans up leftover package traces like dependencies that are no longer used, old Linux kernel headers that won’t be used anymore.
|
||
|
||
In the terminal, just run this command:
|
||
|
||
```
|
||
sudo apt autoremove
|
||
```
|
||
|
||
To get a list of dependency:(For debian only)
|
||
|
||
`dpkg -l | grep 'geany' | awk '{print $2}' | tr "\n" " “`
|
||
|
||
- Handwritten
|
||
|
||
[linux.pdf](../../_resources/linux.pdf)
|
||
|
||
[linux.pdf](../../_resources/linux%201.pdf)
|
||
|
||
- Basics
|
||
|
||
|
||
- Aliases
|
||
|
||
```bash
|
||
myFold="~/Files/Scripts/Main"
|
||
cd $myFold
|
||
```
|
||
|
||
for permanent
|
||
|
||
[https://phoenixnap.com/kb/linux-set-environment-variable](https://phoenixnap.com/kb/linux-set-environment-variable)
|
||
|
||
# **Set an Environment Variable in Linux Permanently**
|
||
|
||
If you wish a variable to persist after you close the shell session, you need to set it as an environmental variable permanently. You can choose between setting it for the current user or all users.
|
||
|
||
1. To set permanent environment variables for a single user, [edit the .bashrc file](https://phoenixnap.com/kb/bashrc):
|
||
|
||
```
|
||
sudo nano ~/.bashrc
|
||
```
|
||
|
||
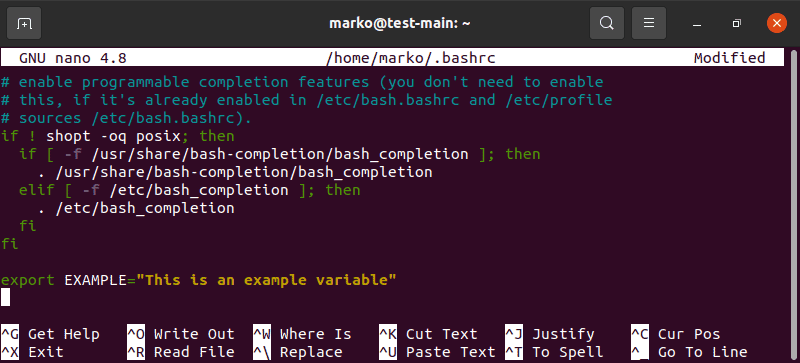
2. Write a line for each variable you wish to add using the following syntax:
|
||
|
||
```
|
||
export [VARIABLE_NAME]=[variable_value]
|
||
```
|
||
|
||
|
||
|
||
3. Save and exit the file. The changes are applied after you restart the shell. If you want to apply the changes during the current session, use the [source command](https://phoenixnap.com/kb/linux-source-command):
|
||
|
||
```
|
||
source ~/.bashrc
|
||
```
|
||
|
||
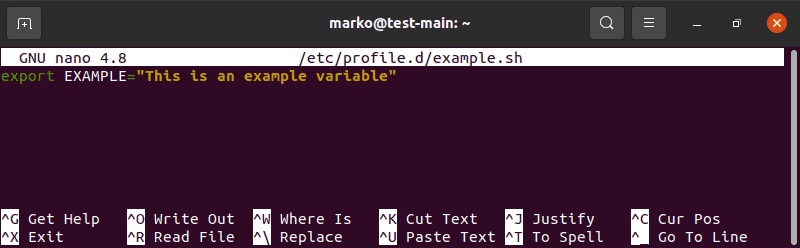
4. To set permanent environment variables for all users, create an **`.sh`** file in the **`/etc/profile.d`** folder:
|
||
|
||
```
|
||
sudo nano /etc/profile.d/[filename].sh
|
||
```
|
||
|
||
5. The syntax to add variables to the file is the same as with **`.bashrc`**:
|
||
|
||
|
||
|
||
6. Save and exit the file. The changes are applied at the next logging in.
|
||
|
||
Alias commands
|
||
|
||
|
||
which command: to get path of certain app:
|
||
|
||
```
|
||
$ which heroku
|
||
/snap/bin/heroku
|
||
```
|
||
|
||
Completey remove folder with contents:
|
||
|
||
`sudo rm -r heroku`
|
||
|
||
for chamging names
|
||
|
||
`for file in [y2mate.com](http://y2mate.com/)*; do
|
||
mv "$file" "${file/y2mate.com -/}"
|
||
done`
|
||
|
||
- chagpt example
|
||
|
||
If you want to rename files that start with **`[SPOTIFY-DOWNLOADER.COM]`** and remove that part, you can use a similar **`rename`** command with a regular expression. Here's how you can do it:
|
||
|
||
```bash
|
||
bashCopy code
|
||
rename 's/^\[SPOTIFY-DOWNLOADER\.COM\]//' '[SPOTIFY-DOWNLOADER.COM]'*
|
||
|
||
```
|
||
|
||
This command will search for files that start with **`[SPOTIFY-DOWNLOADER.COM]`** and replace that part with an empty string, effectively removing it from the filenames. Make sure to use single quotes around the pattern **`[SPOTIFY-DOWNLOADER.COM]*`** to prevent shell expansion of the square brackets.
|
||
|
||
As always, it's a good idea to test this command on a small set of files or create backups before applying it to your entire file set.
|
||
|
||
|
||
- Installing
|
||
|
||
Step 1. Before running the tutorial below, it’s important to make sure your system is up to date by running the following `apt` commands in the terminal:
|
||
|
||
```bash
|
||
sudo apt update
|
||
sudo apt install software-properties-common apt-transport-https wget ca-certificates gnupg2
|
||
```
|
||
|
||
Step 2. Installing VSCodium on Linux Mint 21.
|
||
|
||
By default, VSCodium is not available on the Linux Mint 21 base repository. Now we add the VSCodium repository to your system using the following command:
|
||
|
||
```bash
|
||
echo deb [signed-by=/usr/share/keyrings/vscodium.gpg] https://download.vscodium.com/debs vscodium main | sudo tee /etc/apt/sources.list.d/vscodium.list
|
||
```
|
||
|
||
Next, import the GPG key:
|
||
|
||
```bash
|
||
sudo wget -O- https://gitlab.com/paulcarroty/vscodium-deb-rpm-repo/raw/master/pub.gpg | gpg --dearmor | sudo tee /usr/share/keyrings/vscodium.gpg
|
||
```
|
||
|
||
Now start by updating the packages list and install VSCodium stable by using the command below:
|
||
|
||
```bash
|
||
sudo apt update
|
||
sudo apt install codium
|
||
```
|
||
|
||
- Important tools and softwares
|
||
|
||
`sudo apt install glances` : better task manager
|
||
|
||

|
||
|
||
it is extension of task manager
|
||
|
||
- Taskbar groupping icon
|
||
|
||
1. Hold down Control and click on one of the tabs. This will open up the menu for `Window Buttons` (aka Tasklist).
|
||
2. Click on `Properties`.
|
||
3. Select "Never" from the `Window grouping` option (in the **Behaviour** section of the dialog)
|
||
4. Make a note of how to do this because you'll probably want to re-enable grouping if you ever run an app (e.g. a web browser) with dozens of windows open.
|
||
|
||
- Get access to priviledged section
|
||
|
||
`sudo chmod 755 /usr/local/bin`/codejava
|
||
|
||
- Virtual box
|
||
|
||
For resizing fix: [https://www.youtube.com/watch?v=yrasRjq3HXw](https://www.youtube.com/watch?v=yrasRjq3HXw)
|
||
|
||
- Fun fact
|
||
|
||
When typing vi google will say:
|
||
Did you mean : emacs
|
||
|
||
and When typing emacs google will say:
|
||
|
||
Did you mean : vi
|
||
|
||
- VPN in linux
|
||
|
||
[https://atlasvpn.com/vpn-for-linux](https://atlasvpn.com/vpn-for-linux)
|
||
|
||
- Linux in mobile
|
||
|
||
[https://wiki.termux.com/wiki/Termux-setup-storage](https://wiki.termux.com/wiki/Termux-setup-storage)
|
||
|
||
In order to have access to shared storage (/sdcard or /storage/emulated/0), Termux needs a storage access permission. It is not granted by default and is not requested on application startup since it is not necessary for normal application functioning.
|
||
|
||
Execute command `termux-setup-storage`
|
||
|
||
- Commands
|
||
|
||

|
||
|
||

|
||
|
||
- Installing xdm
|
||
|
||
[https://www.youtube.com/watch?v=cdMiAgQe3_I](https://www.youtube.com/watch?v=cdMiAgQe3_I)
|
||
|
||
|
||
[xdm-browser-monitor-master.zip](../../_resources/xdm-browser-monitor-master-1.zip)
|
||
|
||
- here is the solutions
|
||
|
||
download https://github.com/subhra74/xdm-browser-monitor as a zip and extract it
|
||
|
||
then go to the chrome extension page and activate developper mode
|
||
|
||
then click load extension on the top left and select the chrome folder inside the extracted zip
|
||
|
||
after that just clear the error if there is and you are done
|
||
|
||
|
||
|
||
- Terminal scrolling
|
||
|
||
You can temporarily ***prevent scrolling*** by hitting CTRL-S on the keyboard, which will pause output until you hit CTRL-Q.
|
||
|
||
- Rhythmbox
|
||
- **[Board index](https://forums.linuxmint.com/index.php?sid=69cc8b37f90128fea74650ce5fe17d4b)[Main Edition Support](https://forums.linuxmint.com/viewforum.php?f=126&sid=69cc8b37f90128fea74650ce5fe17d4b)[Hardware Support](https://forums.linuxmint.com/viewforum.php?f=49&sid=69cc8b37f90128fea74650ce5fe17d4b)[Sound](https://forums.linuxmint.com/viewforum.php?f=48&sid=69cc8b37f90128fea74650ce5fe17d4b)**
|
||
|
||
## [[solved] Rhythmbox: multiple library locations does not work](https://forums.linuxmint.com/viewtopic.php?t=14218&sid=69cc8b37f90128fea74650ce5fe17d4b)
|
||
|
||
**Forum rules**Before you post please read [how to get help](https://forums.linuxmint.com/viewtopic.php?f=17&t=83444). Topics in this forum are automatically closed 6 months after creation.
|
||
|
||
**[Locked](https://forums.linuxmint.com/posting.php?mode=reply&t=14218&sid=69cc8b37f90128fea74650ce5fe17d4b)**
|
||
|
||
**Search[Advanced search](https://forums.linuxmint.com/search.php?sid=69cc8b37f90128fea74650ce5fe17d4b)**
|
||
|
||
2 posts • Page **1** of **1**
|
||
|
||
**[hans123](https://forums.linuxmint.com/memberlist.php?mode=viewprofile&u=2232&sid=69cc8b37f90128fea74650ce5fe17d4b)**Level 3Posts: [147](https://forums.linuxmint.com/search.php?author_id=2232&sr=posts&sid=69cc8b37f90128fea74650ce5fe17d4b)Joined: Mon Jun 11, 2007 11:15 am
|
||
|
||

|
||
|
||
### **[[solved] Rhythmbox: multiple library locations does not work](https://forums.linuxmint.com/viewtopic.php?p=87971&sid=69cc8b37f90128fea74650ce5fe17d4b#p87971)**
|
||
|
||
[Post](https://forums.linuxmint.com/viewtopic.php?p=87971&sid=69cc8b37f90128fea74650ce5fe17d4b#p87971) by **[hans123](https://forums.linuxmint.com/memberlist.php?mode=viewprofile&u=2232&sid=69cc8b37f90128fea74650ce5fe17d4b)** » June 28, 2008 6:01 PM
|
||
|
||
I am trying to add multiple directories where my audio files are located to Rhythmbox. This can only be done with gconf-editor by adding directory URIs to the value /apps/rhythmbox/library_locations.But somehow this does not work for me: The list "library_locations" contains '/media/sda10/music,/media/sda8/My Music' but these directories are not monitored or added in Rhythmbox itself. The directory notation I used is the same that Rhythmbox shows when selecting a Library Location in the preferences (with Browse).What am I doing wrong?
|
||
|
||
Last edited by **[LockBot](https://forums.linuxmint.com/memberlist.php?mode=viewprofile&u=338753&sid=69cc8b37f90128fea74650ce5fe17d4b)** on Wed Dec 28, 2022 7:16 am, edited 2 times in total.**Reason:** *Topic automatically closed 6 months after creation. New replies are no longer allowed.*
|
||
|
||
[Top](https://forums.linuxmint.com/viewtopic.php?t=14218#top)
|
||
|
||
**[hans123](https://forums.linuxmint.com/memberlist.php?mode=viewprofile&u=2232&sid=69cc8b37f90128fea74650ce5fe17d4b)**Level 3Posts: [147](https://forums.linuxmint.com/search.php?author_id=2232&sr=posts&sid=69cc8b37f90128fea74650ce5fe17d4b)Joined: Mon Jun 11, 2007 11:15 am
|
||
|
||

|
||
|
||
### **[Re: Rhythmbox: multiple library locations does not work](https://forums.linuxmint.com/viewtopic.php?p=88261&sid=69cc8b37f90128fea74650ce5fe17d4b#p88261)**
|
||
|
||
[Post](https://forums.linuxmint.com/viewtopic.php?p=88261&sid=69cc8b37f90128fea74650ce5fe17d4b#p88261) by **[hans123](https://forums.linuxmint.com/memberlist.php?mode=viewprofile&u=2232&sid=69cc8b37f90128fea74650ce5fe17d4b)** » June 30, 2008 3:03 AM
|
||
|
||
I do not know what you did wrong, but here is a workaround: Point to one directory in Rhythmbox / Pref's / Music / Library Locations. Create Sym Links to the other directories where you keep your music in that one directory and you are set. (So, do not use GConf-Editor) Good Luck!
|
||
|
||
[Top](https://forums.linuxmint.com/viewtopic.php?t=14218#top)
|
||
|
||
**[Locked](https://forums.linuxmint.com/posting.php?mode=reply&t=14218&sid=69cc8b37f90128fea74650ce5fe17d4b)**
|
||
|
||
- Audio equalizer
|
||
|
||
[https://linuxhint.com/install-pulseaudio-equalizer-linux-mint/](https://linuxhint.com/install-pulseaudio-equalizer-linux-mint/)
|
||
|
||
to start, type `qpaeq` in terminal
|
||
|
||
|
||
- For clearing ram cache
|
||
|
||
To clear the RAM cache in Linux, you can use the following methods:
|
||
|
||
1. Clear PageCache:
|
||
|
||
```
|
||
shellCopy code
|
||
$ sudo sync && echo 1 | sudo tee /proc/sys/vm/drop_caches
|
||
|
||
```
|
||
|
||
2. Clear dentries and inodes:
|
||
|
||
```
|
||
shellCopy code
|
||
$ sudo sync && echo 2 | sudo tee /proc/sys/vm/drop_caches
|
||
|
||
```
|
||
|
||
3. Clear PageCache, dentries, and inodes:
|
||
|
||
```
|
||
shellCopy code
|
||
$ sudo sync && echo 3 | sudo tee /proc/sys/vm/drop_caches
|
||
|
||
```
|
||
|
||
- Notion app
|
||
|
||
[https://filelu.com/azswmk187wnl](https://filelu.com/azswmk187wnl)
|
||
|
||
- Adding executable on start menu
|
||
|
||
**20**
|
||
|
||
If you have a launcher in your desktop, then copy/move the launcher from your desktop to the `~/.local/share/applications/` directory. It should appear in the menu.
|
||
|
||
Otherwise, you may manually create a simple `.desktop` launcher (say `eclipse.desktop`) in your `~/.local/share/applications/` directory. The content of the `eclipse.desktop` may be as follows.
|
||
|
||
```
|
||
[Desktop Entry]
|
||
Name=Eclipse
|
||
Exec=/full/path/to/the/executable
|
||
Terminal=false
|
||
Type=Application
|
||
Icon=/full/path/to/the/icon-file
|
||
```
|
||
|
||
- Autocomplete
|
||
|
||
Using autocomplete is as simple as **pressing the [TAB] and the active command line options will fill in**
|
||
|
||
|
||
- Making custom command
|
||
|
||
To create a bash script, enter the following code:
|
||
|
||
```bash
|
||
#!/bin/bash
|
||
#on displays the actual folder name
|
||
echo "the folder is 'pwd'"
|
||
#then the rest of the files
|
||
echo "The folder which contains files are 'ls'"
|
||
```
|
||
|
||
Save this file by pressing **CTRL + O** with Nano. Give it the name of your command.
|
||
|
||
## **How to make the command executable?**
|
||
|
||
If you try to type the name of your bash script, you will notice that it will be executed (run).
|
||
|
||
Now, you have to modify the **CHMOD** of the script that you will run by typing:
|
||
|
||
```bash
|
||
chmod +x yourScript
|
||
```
|
||
|
||
Now, copy your script in the path, **/usr/bin**, like below:
|
||
|
||
```bash
|
||
cp yourscript /usr/bin/
|
||
```
|
||
|
||
- Network issues
|
||
|
||
When using proton vpn, it can have some effect on dns so using these we can fix problem.
|
||
|
||
`nmcli connection show —active`
|
||
|
||
output:
|
||
|
||
<router_company> … … …
|
||
|
||
pvpn-ipv6…. … … …
|
||
|
||
`sudo nmcli connection delete pvpn-ipv6…` and
|
||
|
||
`sudo nmcli connection delete pvpn-killswitch`(if such there)
|
||
|
||
There is another one which is convinent which is change to google dns ie 8.8.8.8
|
||
|
||
sudo tee /etc/resolv.conf <<< “nameserver 8.8.8.8”
|
||
|
||
and then restart server by
|
||
|
||
`sudo service NetworkManager restart` : for ubuntu
|
||
|
||
Note: original resolv.conf for linux mint:
|
||
|
||
```
|
||
nameserver 127.0.0.53
|
||
options edns0 trust-ad
|
||
```
|
||
|
||
- Docker
|
||
|
||
[https://docs.docker.com/engine/install/ubuntu/#set-up-the-repository](https://docs.docker.com/engine/install/ubuntu/#set-up-the-repository) : documentation
|
||
|
||
[https://www.youtube.com/watch?v=Y4ut8kKpPUs](https://www.youtube.com/watch?v=Y4ut8kKpPUs) : video guide
|
||
|
||
```
|
||
sudo apt-get update
|
||
$ sudo apt-get install ca-certificates curl gnupg lsb-release
|
||
(these 4 packages are essential, if already installed then ignore this line)
|
||
```
|
||
|
||
`sudo mkdir -p /etc/apt/keyrings`
|
||
|
||
-p flag to create directories if not already created
|
||
|
||
`curl -fsSL https://download.docker.com/linux/ubuntu/gpg | sudo gpg --dearmor -o /etc/apt/keyrings/docker.gpg`
|
||
|
||
```
|
||
echo \
|
||
"deb [arch="$(dpkg --print-architecture)" signed-by=/etc/apt/keyrings/docker.gpg] https://download.docker.com/linux/ubuntu \
|
||
"$(. /etc/os-release && echo "$VERSION_CODENAME")" stable" | \
|
||
sudo tee /etc/apt/sources.list.d/docker.list > /dev/null
|
||
```
|
||
|
||
Now go to folder /etc/apt/sources.list.d and open file named ‘docker.list’. The contents are:
|
||
`deb [arch=amd64 signed-by=/etc/apt/keyrings/docker.gpg] [https://download.docker.com/linux/ubuntu](https://download.docker.com/linux/ubuntu) vera stable`
|
||
|
||
Change **vera** to **jammy** if using linux mint
|
||
|
||
`sudo apt-get update`
|
||
|
||
for installing docker engine
|
||
|
||
`sudo apt-get install docker-ce docker-ce-cli [containerd.io](http://containerd.io/) docker-buildx-plugin docker-compose-plugin`
|
||
|
||
- Offline installation
|
||
|
||
To download setup(.deb package instead of directly installing it in order to store them for future installation
|
||
|
||
1. Use **`apt-get download`** to download the desired software and its dependencies. For example, for the package
|
||
2. `sudo apt-get download package-name`
|
||
This command will download the .deb packages (or other package format used by your distribution) to the current directory.
|
||
3. Copying packages to the target machine (without internet access):
|
||
- Transfer the downloaded package files (with .deb extension) to the target machine using a USB drive, network sharing, or any other method you prefer.
|
||
4. Installing packages on the target machine:
|
||
- Use **`apt`** to install the downloaded packages. Navigate to the directory containing the .deb packages and run:
|
||
|
||
```bash
|
||
|
||
sudo apt install ./package-name.deb
|
||
|
||
```
|
||
|
||
**Note**: Before this you need to give _apt permission to download it somewhere else like home or root. Its optional and is to avoid warning
|
||
|
||
```
|
||
sudo chown -Rv _apt:root /var/cache/apt/archives/partial/
|
||
sudo chmod -Rv 700 /var/cache/apt/archives/partial/
|
||
```
|
||
|
||
- For automatic keypressing
|
||
|
||
|
||
Download xdotool
|
||
|
||
[http://apt.ubuntu.com/p/xdotool](http://apt.ubuntu.com/p/xdotool) or
|
||
|
||
`apt-get install xdotool`
|
||
|
||
- xbinding
|
||
1. **Install `xbindkeys` and `xdotool` if not already installed:**
|
||
|
||
```bash
|
||
bashCopy code
|
||
sudo apt-get install xbindkeys xdotool
|
||
|
||
```
|
||
|
||
2. **Create the kill switch script:**
|
||
|
||
Create a script named **`kill_script.sh`** with the following content:
|
||
|
||
```bash
|
||
bashCopy code
|
||
#!/bin/bash
|
||
# Kill the running script using pkill
|
||
pkill -f mouse_click_script.sh # Replace with your script name
|
||
|
||
```
|
||
|
||
Make it executable with: **`chmod +x kill_script.sh`**
|
||
|
||
3. **Create or edit the `~/.xbindkeysrc` configuration file:**
|
||
|
||
If you don't have a **`~/.xbindkeysrc`** file, create one. If you do, open it for editing.
|
||
|
||
Add the following line to bind a key combination to the kill script:
|
||
|
||
```bash
|
||
bashCopy code
|
||
"bash /path/to/kill_script.sh"
|
||
Control+Shift+Delete # Customize the key combination as desired
|
||
|
||
```
|
||
|
||
Make sure to replace **`/path/to/kill_script.sh`** with the actual path to your kill script and customize the key combination.
|
||
|
||
4. **Restart `xbindkeys` to apply changes:**
|
||
|
||
Restart the **`xbindkeys`** service to apply your changes:
|
||
|
||
```bash
|
||
bashCopy code
|
||
killall xbindkeys
|
||
xbindkeys
|
||
|
||
```
|
||
|
||
|
||
To press a key (in this example 'a') every two seconds you can use a script like this :
|
||
|
||
```bash
|
||
#!/bin/bash
|
||
|
||
while true; do
|
||
xdotool key a
|
||
sleep 2
|
||
done
|
||
```
|
||
|
||
- Keycodes list
|
||
|
||
Up
|
||
Down
|
||
Left
|
||
Right
|
||
F1
|
||
F2
|
||
F3
|
||
F4
|
||
F5
|
||
F6
|
||
F7
|
||
F8
|
||
F9
|
||
F10
|
||
F11
|
||
F12
|
||
Escape
|
||
Return
|
||
Enter
|
||
Tab
|
||
BackSpace
|
||
Delete
|
||
Insert
|
||
Home
|
||
End
|
||
Page_Up
|
||
Page_Down
|
||
Pause
|
||
Print
|
||
Scroll_Lock
|
||
Num_Lock
|
||
Caps_Lock
|
||
Shift_L
|
||
Shift_R
|
||
Control_L
|
||
Control_R
|
||
Meta_L
|
||
Meta_R
|
||
Alt_L
|
||
Alt_R
|
||
Super_L
|
||
Super_R
|
||
Hyper_L
|
||
Hyper_R
|
||
|
||
|
||
- Wine
|
||
|
||
[https://phoenixnap.com/kb/how-to-install-wine-on-ubuntu](https://phoenixnap.com/kb/how-to-install-wine-on-ubuntu)
|
||
|
||
for installing gecko
|
||
|
||
`wget [https://dl.winehq.org/wine/wine-gecko/2.47.1/wine-gecko-2.47.1-x86_64.msi](https://dl.winehq.org/wine/wine-gecko/2.47.1/wine-gecko-2.47.1-x86_64.msi)`
|
||
|
||
`mv wine-gecko-2.47.1-x86_64.msi ~/.wine/drive_c/windows/system32/gecko/`
|
||
|
||
`wineboot` when using for first time
|
||
|
||
to open uninstaller use
|
||
|
||
`wine uninstaller`
|
||
|
||
`wine regedit` --for opening regedit
|
||
|
||
to install or open files use
|
||
|
||
`wine start idman.exe` .
|
||
|
||
`remove wine and wineboot` to bring back to its default state and uninstalling all programs
|
||
|
||
- Blank browser pages in chromium browsers
|
||
|
||
[https://www.ghacks.net/2023/07/12/chromium-based-browsers-are-not-loading-pages-properly-on-linux-heres-how-to-fix-it/](https://www.ghacks.net/2023/07/12/chromium-based-browsers-are-not-loading-pages-properly-on-linux-heres-how-to-fix-it/)
|
||
|
||
- Free up space
|
||
|
||
[https://www.youtube.com/watch?v=7URA1MnuEi8](https://www.youtube.com/watch?v=7URA1MnuEi8)
|
||
|
||
[https://www.tecmint.com/free-disk-space-ubuntu-linux-mint/](https://www.tecmint.com/free-disk-space-ubuntu-linux-mint/)
|
||
|
||
- Free swap space
|
||
|
||
However, if you really feel that you need to force it, (I can see a scenario where you would want to know the system will be responsive later) you can momentarily disable and re-enable swap
|
||
|
||
```
|
||
sudo swapoff -a
|
||
sudo swapon -a
|
||
|
||
```
|
||
|
||
OR alternatively as a single line
|
||
|
||
```
|
||
sudo swapoff -a; sudo swapon -a
|
||
|
||
```
|
||
|
||
|
||
- Installing of programs in another drive
|
||
|
||
|
||
[https://forums.linuxmint.com/viewtopic.php?t=361746](https://forums.linuxmint.com/viewtopic.php?t=361746)
|
||
|
||
```
|
||
When you say "It automatically tries to install things to the ssd" - - is there a particular location to which these "things" are installing, or is it all over in different locations? I'm going to assume that it's not all in 1 location, and these installations land wherever is appropriate based on the particular installer. (Otherwise, you would have chosen the target location to install - right?)
|
||
|
||
Depending on how much money & effort you want to spend, I can suggest 4 options:
|
||
|
||
1. Replace your 15GB SSD with something larger, and then clone the 15GB onto that larger drive.
|
||
This would be the easiest, assuming that you can make that swap. 15GB is nothing these days, and I'm honestly surprised that you were even able to get Mint to install on something that small. A 256GB can be had for around $50 or less these days, which would give you far more breathing room.
|
||
|
||
2. Resize & Repartition your 2TB drive and clone your 15GB into that space. This would be the cheapest option, if you could eke out a 256GB partition from your 2TB as a boot partition. It could be tricky, and I would highly recommend backing up anything important on that drive in case something gets mucked up during the operation...but if done right, you would end up booting directly from the 2TB, and wouldn't need that 15GB drive at all.
|
||
|
||
3. Create additional folders on the 2TB drive and mount them within your fstab into whatever directories on your / drive that need it most. This could be your /usr, /var, /etc, or even /home - depending on exactly which directories are being overloaded most. You'd then have to copy all data from your source 15GB drive folders (recursively, including subdirectories & permissions) to the respective new folder on the 2TB drive. This would be by far the most complex, and I wouldn't recommend it unless you have a good deal of experience working in the terminal along with a very good understanding of how Linux-like file systems work.
|
||
|
||
The fact is that unless your program is 100% self-contained with *all* of the dependencies in a single folder, you're likely to have bits & pieces installed in a variety of locations. You're not going to successfully move an application to a new location without going into each & every piece of that application to map out their relationship to one another, and adjusting accordingly. This would also permanently screw up your ability to update that application down the road. It is far better to either reinstall that app (if you have the ability to choose a target location) or to simply accept the program's structure and find a way to make space for it.
|
||
|
||
4. One other option - - depending on how much data you have/how much time you're willing to spend backing up or re-downloading - - re-install Mint directly onto that 2TB drive. This would be the cleanest option, and would avoid having to muck around with changing hardware around or playing with partitions. We don't know what programs & applications you have, or really anything at this point about your hardware & level of experience....but that would be the #1 thing to consider, in my opinion?
|
||
```
|
||
|
||
- With Partition
|
||
|
||
Installing programs on another drive in Linux is possible, and it can be useful if you want to manage disk space efficiently or have specific storage requirements. The steps to achieve this may vary slightly depending on your Linux distribution, but the general process is as follows:
|
||
|
||
1. **Partition and Format the Drive:**
|
||
If the drive is not already partitioned and formatted, you need to do that first. Use tools like **`fdisk`**, **`parted`**, or **`gparted`** to create a new partition on the drive and then format it with an appropriate file system like ext4.
|
||
2. **Mount the Drive:**
|
||
Once the drive is formatted, you need to mount it to a directory in your file system. Choose a suitable mount point, create a directory (if it doesn't already exist), and mount the new partition using the **`mount`** command. For example:
|
||
|
||
```bash
|
||
bashCopy code
|
||
sudo mount /dev/sdXY /mnt/my_new_drive
|
||
|
||
```
|
||
|
||
Replace **`/dev/sdXY`** with the correct partition identifier, and **`/mnt/my_new_drive`** with your chosen mount point.
|
||
|
||
3. **Configure the Fstab File (optional):**
|
||
To mount the drive automatically at boot, you can add an entry to the **`/etc/fstab`** file. Open the file with a text editor (with root privileges) and add a line like this:
|
||
|
||
```bash
|
||
bashCopy code
|
||
/dev/sdXY /mnt/my_new_drive ext4 defaults 0 0
|
||
|
||
```
|
||
|
||
Again, replace **`/dev/sdXY`** and **`/mnt/my_new_drive`** with your partition and mount point.
|
||
|
||
4. **Install Programs to the New Drive:**
|
||
When you install new programs, use the package manager of your distribution to specify the custom installation path on the new drive. For example, with **`apt`** (used in Debian-based systems), you can use the **`o`** option to set the installation path:
|
||
|
||
```arduino
|
||
arduinoCopy code
|
||
sudo apt-get install package_name -o dir::cache=/mnt/my_new_drive
|
||
|
||
```
|
||
|
||
This will install **`package_name`** on the specified path.
|
||
|
||
|
||
Remember to adjust the commands according to your specific drive and mount point settings. Always be cautious when working with partitions and the filesystem, as it can lead to data loss if not done properly.
|
||
|
||
Additionally, if your intent is to move an already-installed program to another drive, it may be more complex and require additional steps depending on the application. In such cases, it is often simpler to reinstall the program with the custom installation path as described above.
|
||
|
||
- Without partition
|
||
|
||
Yes, you can install programs on another drive without creating a separate partition by using symbolic links or bind mounts. This method allows you to create a link from the original program directory to a directory on the other drive. This way, the program will appear to be installed on the primary drive, but its files will actually reside on the secondary drive.
|
||
|
||
Here's how you can do it using symbolic links or bind mounts:
|
||
|
||
**Symbolic Links:**
|
||
|
||
1. First, create a directory on the other drive where you want to store the program's files. For example:
|
||
|
||
```bash
|
||
bashCopy code
|
||
sudo mkdir /mnt/my_new_drive/my_programs
|
||
|
||
```
|
||
|
||
2. Next, install the program as you would normally do. Let's assume the program is installed in the default location, such as **`/usr/bin/my_program`**.
|
||
3. Move the program's files to the directory on the other drive using **`mv`**:
|
||
|
||
```bash
|
||
bashCopy code
|
||
sudo mv /usr/bin/my_program /mnt/my_new_drive/my_programs/
|
||
|
||
```
|
||
|
||
4. Create a symbolic link from the original location to the new location on the other drive:
|
||
|
||
```bash
|
||
bashCopy code
|
||
sudo ln -s /mnt/my_new_drive/my_programs/my_program /usr/bin/my_program
|
||
|
||
```
|
||
|
||
|
||
Now, when you run **`my_program`**, it will execute the program from the other drive even though the link is in the usual location.
|
||
|
||
**Bind Mounts:**
|
||
|
||
1. Create a directory on the other drive where you want to store the program's files, similar to the previous method.
|
||
2. Install the program as usual.
|
||
3. Instead of using symbolic links, you can mount the new directory over the original program directory using a bind mount. First, unmount the directory if it's already mounted:
|
||
|
||
```bash
|
||
|
||
sudo umount /usr/bin/my_program
|
||
|
||
```
|
||
|
||
4. Mount the new directory over the original program directory using the bind mount:
|
||
|
||
```bash
|
||
|
||
sudo mount --bind /mnt/my_new_drive/my_programs/my_program /usr/bin/my_program
|
||
|
||
```
|
||
|
||
5. Update the **`/etc/fstab`** file to ensure the bind mount is persistent across reboots. Add the following line:
|
||
|
||
```bash
|
||
|
||
/mnt/my_new_drive/my_programs/my_program /usr/bin/my_program none bind 0 0
|
||
|
||
```
|
||
|
||
|
||
Remember to replace **`/mnt/my_new_drive/my_programs/my_program`** with the actual path to the program on the other drive.
|
||
|
||
Both methods achieve a similar outcome: installing the program on another drive without creating a separate partition. The symbolic link method is easier to set up, while bind mounts are more suitable for long-term and persistent use as they survive reboots.
|
||
|
||
- Battery drain
|
||
|
||
[https://fosspost.org/7-tips-to-reduce-battery-usage-on-linux/](https://fosspost.org/7-tips-to-reduce-battery-usage-on-linux/)
|
||
|
||
- Disabling peripherals
|
||
|
||
[https://askubuntu.com/questions/160945/is-there-a-way-to-disable-a-laptops-internal-keyboard](https://askubuntu.com/questions/160945/is-there-a-way-to-disable-a-laptops-internal-keyboard)
|
||
|
||
Sure, you can disable the internal keyboard on a Linux system while using an external keyboard. Here's a way to do it using the command line. Please note that you might need root (administrator) privileges to perform some of these actions.
|
||
|
||
1. **Identify the internal keyboard device:**
|
||
|
||
Open a terminal and enter the following command to list input devices:
|
||
|
||
```bash
|
||
bashCopy code
|
||
xinput list
|
||
|
||
```
|
||
|
||
Look for the entry corresponding to your internal keyboard. It will be listed along with its ID number.
|
||
|
||
2. **Disable the internal keyboard:**
|
||
|
||
Once you have identified the ID of your internal keyboard, you can use the following command to disable it:
|
||
|
||
```bash
|
||
bashCopy code
|
||
xinput float <internal_keyboard_id>
|
||
|
||
```
|
||
|
||
Replace **`<internal_keyboard_id>`** with the actual ID of your internal keyboard.
|
||
|
||
3. **Re-enable the internal keyboard:**
|
||
|
||
If you want to re-enable the internal keyboard later, you can use the following command:
|
||
|
||
```bash
|
||
bashCopy code
|
||
xinput reattach <internal_keyboard_id> <master_id>
|
||
|
||
```
|
||
|
||
Replace **`<internal_keyboard_id>`** with the ID of your internal keyboard and **`<master_id>`** with the ID of the master device (usually the external keyboard or a virtual core device).
|
||
|
||
|
||
Please note that these changes will not persist across reboots. If you want the internal keyboard to remain disabled even after restarting your system, you might need to create a script that runs these commands during startup.
|
||
|
||
Remember that working with input devices can have implications, and disabling devices might lead to unexpected behaviors. Make sure you have a way to revert the changes if needed.
|
||
|
||
- Download manager
|
||
|
||
https://itsfoss.com/best-download-managers-linux/?fbclid=IwAR07vrVKSzaMZz5WNPo8KRjAA6VfX-bYPVnLe8IiU9Yi_YJ4wH0ZaijncZ8
|
||
|
||
- More apps
|
||
|
||
|
||
https://itsfoss.com/best-ubuntu-apps/
|
||
|
||
https://www.geeksmint.com/awesome-linux-software/
|
||
|
||
- Cons of linux
|
||
1. Consumes more battery because its drivers are not optimised as hardware firmwares are not open source but windows has a deal
|
||
2. Audio and video driver are not that good
|
||
3. hibernate is disabled by default
|
||
4. no backward compatibility
|
||
5. Not all softwares are available for Linux
|
||
6. Fragmentation
|
||
- Pirated gaming
|
||
|
||
Lutris
|
||
|
||
- lightweight distros
|
||
|
||
[https://itsfoss.com/lightweight-linux-beginners/#5-bodhi-linux](https://itsfoss.com/lightweight-linux-beginners/#5-bodhi-linux)
|
||
|
||
- Appimage
|
||
|
||
`chmod a+x <appimageFile>`
|
||
|
||
- Resizing partition
|
||
|
||
[https://www.youtube.com/watch?v=Kyz9x71gEPI](https://www.youtube.com/watch?v=Kyz9x71gEPI)
|
||
|
||
[https://e.pcloud.link/publink/show?code=XZWaeWZbzlFCCXrg0mX6XFcsNXvykHLqNkk](https://e.pcloud.link/publink/show?code=XZWaeWZbzlFCCXrg0mX6XFcsNXvykHLqNkk)
|
||
|
||
[https://sdrive.app/s/xnwhq1znzhn8kvyi3a9j71zo](https://sdrive.app/s/xnwhq1znzhn8kvyi3a9j71zo)
|
||
|
||
[https://files.sdrive.app/6e9bb95b-7524-437a-9c6e-54974f58b3fd.mp4](https://files.sdrive.app/6e9bb95b-7524-437a-9c6e-54974f58b3fd.mp4)
|
||
|
||
- WinRAR
|
||
|
||
[https://www.win-rar.com/download.html?&L=0](https://www.win-rar.com/download.html?&L=0)
|
||
|
||
You can extract a RAR file that is password protected on Linux with a utility called `unrar`
|
||
|
||
```
|
||
1 sudo apt install unrar
|
||
2
|
||
|
||
```
|
||
|
||
```
|
||
1 # provide a password with -p
|
||
2 unrar e -pPASSWORD FILE.rar
|
||
3
|
||
|
||
```
|
||
|
||
To just extract a file that has no password, only pass the `e` flag
|
||
|
||
```
|
||
1 unrar e FILE.rar
|
||
|
||
```
|
||
|
||
[rarlinux-x64-623.tar.gz](../../_resources/rarlinux-x64-623.tar.gz)
|
||
|
||
- Portable firefox
|
||
|
||
[https://www.airaghi.net/en/2017/03/22/install-mozilla-firefox-portable-on-linux/](https://www.airaghi.net/en/2017/03/22/install-mozilla-firefox-portable-on-linux/)
|
||
|
||
- Recently installed
|
||
1. docker images
|
||
2. golang
|
||
3. libsecret
|
||
- Disable bluetooth on startup
|
||
|
||
For this ubuntu edit `/etc/bluetooth/main.conf` and find the line
|
||
|
||
```
|
||
AutoEnable=true
|
||
|
||
```
|
||
|
||
and replace it with:
|
||
|
||
```
|
||
AutoEnable=false
|
||
```
|
||
|
||
- NordVpn
|
||
|
||
sign the key by downloading asc from
|
||
|
||
[https://repo.nordvpn.com/gpg/nordvpn_public.asc](https://repo.nordvpn.com/gpg/nordvpn_public.asc)
|
||
|
||
then
|
||
|
||
`sudo apt-key add nordvpn-public-key.asc`
|
||
|
||
`sudo nano /etc/apt/sources.list.d/nordvpn.list`
|
||
|
||
`deb [arch=amd64 signed-by=/usr/share/keyrings/nordvpn-archive-keyring.gpg]`
|
||
|
||
then download .deb file from here ‘[https://repo.nordvpn.com/deb/nordvpn/debian/pool/main/nordvpn_3.16.6_i386.deb](https://repo.nordvpn.com/deb/nordvpn/debian/pool/main/nordvpn_3.16.6_i386.deb)’
|
||
|
||
or
|
||
|
||
[https://file.lu/d/1noK](https://file.lu/d/1noK)
|
||
|
||
- Login
|
||
- type `nordvpn login` into the cli
|
||
- proceed through the browser
|
||
- once you've logged in copy the link where it says "return to the app" (it should be something like `nordvpn://login` etc)
|
||
- go back to cli and type `nordvpn login --callback "pasted-url-from-before"` (pay attention to quote the url!)
|
||
- now you're logged in
|
||
- connect
|
||
|
||
`nordvpn connect <country_name>` (no need of country code and server address)
|
||
|
||
- suspend/sleep
|
||
|
||
[https://askubuntu.com/questions/543921/authentication-required-before-suspend](https://askubuntu.com/questions/543921/authentication-required-before-suspend)
|
||
|
||
1. In command line run:
|
||
|
||
```
|
||
locate -b org.freedesktop.login1.policy
|
||
|
||
```
|
||
|
||
The found file is
|
||
|
||
```
|
||
/usr/share/polkit-1/actions/org.freedesktop.login1.policy
|
||
|
||
```
|
||
|
||
2. In the file, near line
|
||
|
||
```xml
|
||
<action id="org.freedesktop.login1.suspend">
|
||
|
||
```
|
||
|
||
check these:
|
||
|
||
```xml
|
||
<defaults>
|
||
<allow_any>yes</allow_any>
|
||
<allow_inactive>yes</allow_inactive>
|
||
<allow_active>yes</allow_active>
|
||
</defaults>
|
||
``` |