
26 KiB
Extras
- aptitude
better than
apt getaptitude is a command-line package manager Basically it helps with everything related to packages like removal installation ecc... https://wiki.debian.org/Aptitude - Binary blobs in linux https://www.reddit.com/r/linux/comments/ui4wal/so_where_are_the_closedsource_binary_blobs_in/
- sftp, scp
https://superuser.com/questions/326211/best-way-to-transfer-files-over-a-lan-between-two-linux-computers
scp tldrs
single file
scp myfile.txt user@192.168.1.5:/home/user/entire directoryscp -r my_folder/ user@192.168.1.5:/home/user/flags-p: for preserving metadata-P: custom port-C: compression for saving bandwidth - To run .sh file as a command
Make it executable by
chmod +x script. also remove.shextension too so it will bescriptand notscript.shEither add in/usr/binas$PATHvariable contain that directory or add your directory where the script is there by editing~/.bashrcfileexport PATH=$PATH:$HOME/<script_folder>$HOMEcontainshome/<username>as directory - ssh issue
If u get error when trying to connect with ssh like this
Then use the command@@@@@@@@@@@@@@@@@@@@@@@@@@@@@@@@@@@@@@@@@@@@@@@@@@@@@@@@@@@ @ WARNING: REMOTE HOST IDENTIFICATION HAS CHANGED! @ @@@@@@@@@@@@@@@@@@@@@@@@@@@@@@@@@@@@@@@@@@@@@@@@@@@@@@@@@@@ IT IS POSSIBLE THAT SOMEONE IS DOING SOMETHING NASTY! Someone could be eavesdropping on you right now (man-in-the-middle attack)! It is also possible that a host key has just been changed. The fingerprint for the RSA key sent by the remote host is 6e:45:f9:a8:af:38:3d:a1:a5:c7:76:1d:02:f8:77:00. Please contact your system administrator. Add correct host key in /home/hostname /.ssh/known_hosts to get rid of this message. Offending RSA key in /var/lib/sss/pubconf/known_hosts:4 RSA host key for pong has changed and you have requested strict checking. Host key verification failed.ssh-keygen -R <host>Eg :ssh-keygen -R 192.168.3.10 - MFT error
When disk is of ntfs and it is unplugged unsafely then when reconnected error can be MFTmirror do not match MFT so correct it with
sudo ntfsfix /dev/sdb1Make surentfs-3gmust be installed - to get ip address
ipinfo.ioip.imip.mecurl ifconfig.cocurl ifconfig.mecurl icanhazip.com - For getting cname use this
nslookup -Q=cname www.youtube.com - Change DNS
Changing the DNS server to 1.1.1.1 (Cloudflare's DNS service) in Arch Linux can provide you with faster and more private internet browsing. The specific steps to change your DNS settings can depend on whether you are using NetworkManager, systemd-resolved, or another network management tool on your Arch Linux setup. Below are methods for the two most common tools, NetworkManager and systemd-networkd with systemd-resolved:
For NetworkManager users:
-
Using the GUI:
If you're using a graphical environment, you can change the DNS settings through the NetworkManager applet.
- Right-click on the NetworkManager icon in the system tray and select
Edit Connections. - Select the connection you want to edit and click on the
Gearicon orEditbutton. - Go to the
IPv4 SettingsorIPv6 Settingstab. - Change the
MethodtoAutomatic (DHCP) addresses onlyorManualif you set your IP address statically. - Enter
1.1.1.1, 1.0.0.1in theDNS serversfield. For IPv6, use2606:4700:4700::1111, 2606:4700:4700::1001. - Click
Saveand close the Network Connections window. - Finally, disable and re-enable the network connection for the changes to take effect.
- Right-click on the NetworkManager icon in the system tray and select
-
Using the terminal:
- You can also edit the NetworkManager configuration file directly for the connection. Connection profiles are stored in
/etc/NetworkManager/system-connections/. Find the profile you wish to edit and open it with a text editor (as root). You may need to installnanoor use another available editor.sudo nano /etc/NetworkManager/system-connections/YourConnectionName.nmconnection - Add the following lines under the
[ipv4]or[ipv6]sections:
For IPv6:dns=1.1.1.1;1.0.0.1;dns=2606:4700:4700::1111;2606:4700:4700::1001; - Save the changes and restart NetworkManager:
sudo systemctl restart NetworkManager
- You can also edit the NetworkManager configuration file directly for the connection. Connection profiles are stored in
For systemd-networkd with systemd-resolved users:
-
Edit or Create a network file:
Your network configuration files are located in
/etc/systemd/network/. If you're using systemd-networkd for managing the network, edit the corresponding.networkfile for your connection.- Open the relevant
.networkfile in a text editor (as root):sudo nano /etc/systemd/network/your_network_file.network - Add or modify the following section to set Cloudflare's DNS servers:
[DHCP] UseDNS=false [Network] DNS=1.1.1.1 DNS=1.0.0.1 # For IPv6 DNS=2606:4700:4700::1111 DNS=2606:4700:4700::1001 - Save the file and exit the editor.
- Open the relevant
-
Restart systemd-networkd and systemd-resolved:
- Apply the changes by restarting the services:
sudo systemctl restart systemd-networkd
sudo systemctl restart systemd-resolved
- Apply the changes by restarting the services:
-
Ensure systemd-resolved is used for DNS resolution:
- Create a symlink to use systemd-resolved's stub resolver:
sudo ln -sf /run/systemd/resolve/stub-resolv.conf /etc/resolv.conf
- Create a symlink to use systemd-resolved's stub resolver:
Remember to replace placeholder texts like YourConnectionName or your_network_file.network with the actual names specific to your setup. Each setup might be slightly different, so adjust the steps according to your network management tool and configuration.
Supervisord
like pm2 but not limited to nodejs
- Create a config file for supervisord and store it anywhere
[supervisord] nodaemon=true [program:app1] command=node /path/to/app1/app.js directory=/path/to/app1 autostart=true autorestart=true stdout_logfile=/path/to/app1.log stderr_logfile=/path/to/app1_error.log [program:app2] command=node /path/to/app2/app.js directory=/path/to/app2 autostart=true autorestart=true stdout_logfile=/path/to/app2.log stderr_logfile=/path/to/app2_error.log - Then start it with
sudo supervisord -c /home/user/supervisor/supervisord.confThen for interactingsudo supervisorctl start app1sudo supervisorctl stop app1sudo supervisorctl restart app1sudo supervisorctl status - Issues
sometimes when using package manager supervisor may not work properly so install it with pip.
pip install supervisor. sometimes if pip is not installed then upgrade your python package - Setting up proxy
In
~/.bashrcadd following so that terminals can use proxy
for systemwide add inexport http_proxy="210.61.216.63:60808" export https_proxy="115.87.207.193:8080"/etc/environemnt. sudo systemd-analyze: this will tell the boot time of firmware+loader+kernel+userspace- using proxy with curl
curl -x 37.27.29.181:80 ipinfo.iohere37.27.29.181:80is proxy-xis flag for proxy
inotify
Note : inotify wont work to detect changes in remote system https://unix.stackexchange.com/questions/238956/is-there-a-way-to-use-inotify-on-remote-filesystems-specifically-webdav make changes or execute script when changes on files or directory
-
install ionotify and rsync
sudo apt-get install inotify-tools rsync -
Create a script with following (for syncing directories)
#!/bin/bash

  SOURCE="/path/to/source"
  DESTINATION="/path/to/destination"

  # Function to sync directories
  sync_directories() {
  	# a for archiving(preserving metadata), v for verbose, z for compressing
  	rsync -avz --delete "$SOURCE/" "$DESTINATION/"
  }

  # Ensure initial sync
  sync_directories

  # Monitor the source directory for any activity, and sync upon changes
  # while read -r directory events filename; do: This line starts a while loop that reads input and assigns the values to three variables: directory, events, and filename. -r option is used with read command to prevent backslashes from acting as escape characters.
  inotifywait -mre close_write,create,delete,move "$SOURCE" |
  	while read -r directory events filename; do
  		sync_directories
  	done
finally make it executable
chmod +x sync_directories.sh -
bidirectional sync without noticing deletions ie only modifications of files will be noticed (for directories)
   #!/bin/bash

  SOURCE=$1
  DESTINATION=$2

  # Function to sync directories
  sync_directories() {
    # u means updates
    # deletions will be ignored with flag --ignore-existing
  	rsync -avu --ignore-existing "$SOURCE/" "$DESTINATION/"
  }

  sync_directories2() {
  	   rsync -avu --ignore-existing  "$DESTINATION/" "$SOURCE/"
  }

  # Ensure initial sync
  sync_directories

  # Monitor the source directory for any activity, and sync upon changes
  inotifywait -mre close_write,create,delete,move "$SOURCE" |
  	while read -r directory events filename; do
  		sync_directories
  	done

  inotifywait -mre close_write,create,delete,move "$DESTINATION" |
     while read -r directory events filename; do
  		sync_directories2
  	done
or use unison Do the initial sync:
unison -auto -batch dirA dirBRun the continuous bidirectional sync:
unison -auto -batch -repeat watch -times dirA dirB -
for syncing files unidirectional
#!/bin/bash

  SOURCE_FILE="/path/to/source/myfile.txt"
  TARGET_FILE="/path/to/target/myfile.txt"

  # Loop forever
  while true; do
    # Wait for modifications to the specified file
    inotifywait -e modify,move,create,delete "$SOURCE_FILE" && \
    # Sync file. Here, we use cp, but you could use rsync or other commands depending on your needs
     rsync -avu --delete  "$SOURCE_FILE" "$TARGET_FILE"
  done
bidirectional inotify itself wont detect changes and even if we write 2 different statements then it will wait for first one to complete so we need to create 2 different sh files and execute those files in background
sync_directories1.shSOURCE=$1 DESTINATION=$2 db_name= "main.kdbx" SOURCE_FILE="$SOURCE/${db_name}" DESTINATION_FILE= "$DESTINATION/${db_name}" # Function to sync directories sync_directories() { rsync -avu --ignore-existing "$SOURCE/${db_name}" "$DESTINATION/${db_name}" } # Ensure initial sync sync_directories # Monitor the source directory for any activity, and sync upon changes inotifywait -mre close_write,create,delete,move "$SOURCE" | while read -r directory events filename; do sync_directories donesync_directories2.shSOURCE=$1 DESTINATION=$2 db_name= "main.kdbx" SOURCE_FILE="$SOURCE/${db_name}" DESTINATION_FILE= "$DESTINATION/${db_name}" # Function to sync directories sync_directories2() { rsync --ignore-existing "$DESTINATION/${db_name}" "$SOURCE/${db_name}" } # Ensure initial sync sync_directories2 inotifywait -mre close_write,create,delete,move "$DESTINATION" | while read -r directory events filename; do sync_directories2 donesync_directories.sh./sync_directories1.sh /path/to/first /path/to/second & ./sync_directories2.sh /path/to/first /path/to/second &Finally execute
sync_directories.shWarning : using & means there will be problem in closing it -
nohup to run script in backround without needing to keep terminal open if not available then install this with whole toolkit ie
coreutilsnohup script.sh &this will cause problems if we have to close processes -
screen : multiplexer which will emulates terminal in background instead of process itself so easy to terminate processes. https://sentrytwo.com/6bb78a2539
to start the process in detached mode
screen -dmS sync1 ./sync_directories1.shthis will start the session with name sync1 to close the session
screen -S sync1 -X quit -
cron jobs
- in arch by default cron service isnt installed so install it by
pacman -S croniehttps://phoenixnap.com/kb/set-up-cron-job-linux - Start cron service by
sudo systemctl start cron.servicein archsudo systemctl start cronie.service - add cron tab through
crontab -ethen type* * * * * /home/hpes/Videos/imp/scripts/crons/cronscript.shcron jub will run every minute Syntax is<minute> <hour> <day_of_the_month> <month_of_the_year> <day_of_the_week> /path/to/your_script.shcrontab location is/var/spool/cron/
- in arch by default cron service isnt installed so install it by
-
Managing history in linux https://www.cyberciti.biz/faq/disable-bash-shell-history-linux/
-
check what service is connected to port (say 8080)
lsof -i :8080 -Sornetstat -a | grep 8080 -
text to speech using espeak
espeak 'wake up' 2>/dev/nullto get list of voicesespeak voicesto set the voiceespeak -v <voice> -
umount target is busy
sudo umount -l /mnt/pendrive/-lis important this is still dangerous though bcz it can unmount even the partition of the current os
https://stackoverflow.com/questions/7878707/how-to-unmount-a-busy-device
- list drivers
https://discuss.kde.org/t/settings-says-no-touchpad-found/14139
libinput list-devices - hard reboot and hard shutdown
Terminal command for hard-shutdown,
sudo sh -c "echo o > /proc/sysrq-trigger"Terminal command for hard-restart,sudo sh -c "echo b > /proc/sysrq-trigger" - aliases
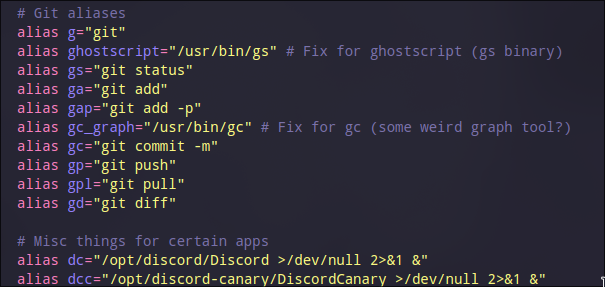
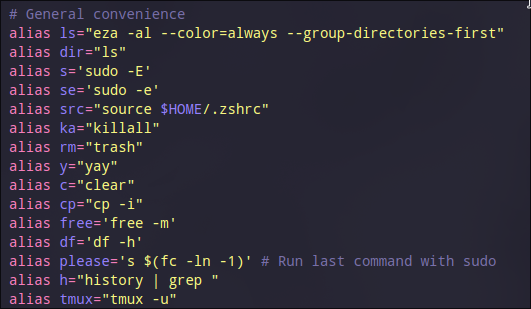
- direnv to load and unload environment variables depending on current directory https://direnv.net/
- date
You can refer to the following table to generate timestamps in various formats: Format / result Command Output YYYY-MM-DD date -I $(date -I) YYYY-MM-DD_hh:mm:ss date +%F_%T $(date +%F_%T) YYYYMMDD_hhmmss date +%Y%m%d_%H%M%S $(date +%Y%m%d_%H%M%S) YYYYMMDD_hhmmss (UTC version) date --utc +%Y%m%d_%H%M%SZ $(date --utc +%Y%m%d_%H%M%SZ) YYYYMMDD_hhmmss (with local TZ) date +%Y%m%d_%H%M%S%Z $(date +%Y%m%d_%H%M%S%Z) YYYYMMSShhmmss date +%Y%m%d%H%M%S $(date +%Y%m%d%H%M%S) YYYYMMSShhmmssnnnnnnnnn date +%Y%m%d%H%M%S%N $(date +%Y%m%d%H%M%S%N) YYMMDD_hhmmss date +%y%m%d_%H%M%S $(date +%y%m%d_%H%M%S) Seconds since UNIX epoch date +%s $(date +%s) Nanoseconds only date +%N $(date +%N) Nanoseconds since UNIX epoch date +%s%N $(date +%s%N) ISO8601 UTC timestamp date --utc +%FT%TZ $(date --utc +%FT%TZ) ISO8601 UTC timestamp + ms date --utc +%FT%T.%3NZ $(date --utc +%FT%T.%3NZ) ISO8601 Local TZ timestamp date +%FT%T%Z $(date +%FT%T%Z) YYYY-MM-DD (Short day) date +%F\(%a\) $(date +%F\(%a\)) YYYY-MM-DD (Long day) date +%F\(%A\) $(date +%F\(%A\)) - finding duplicates
for current dir
for custom onefind -not -empty -type f -printf "%s " | sort -rn | uniq -d | xargs -I{} -n1 find -type f -size {}c -print0 | xargs -0 md5sum | sort | uniq -w32 --all-repeated=separatefind "$DIR" -not -empty -type f -printf "%s\n" | sort -rn | uniq -d | xargs -I{} -n1 find "$DIR" -type f -size {}c -print0 | xargs -0 md5sum | sort | uniq -w32 --all-repeated=separate - fzf usage
find * -type f | fzf --multi > selected1select files with shift+tab and then press enter and all the path will be saved to selected1 file - pretty print json
jq . package.jsonhere.is for current directory as top level directory is needed here and for reading large json do thisjq '.' large_file.json | less - change default browser
xdg-settings set default-web-browser <insert the filename>.desktop - get hashes
sha256sum <file>. so there are others too:sha1sum,md5sumSHA-2 Family: The sha1sum tool, which uses SHA-1, is part of the broader SHA (Secure Hash Algorithm) family. Other members of this family include: sha256sum (256-bit hash, more secure than SHA-1) sha224sum (224-bit hash) sha384sum (384-bit hash) sha512sum (512-bit hash, offers maximum security in the SHA family) Blake2 : b2sum SHA-3 :openssl sha3-256 file.txtsha types.txt - aur alternatuve in other distros Most distributions have larger repositories so don't need an AUR. Though, if you really want to dive into third-party repositories, I mean, there is Pacstall for Debian, Copr for Fedora, PPAs for Ubuntu, the community build system for openSUSE, the SlackBuilds for Slackware.
Plus Nix and pkgsrc are cross-distro and massive.
Basically no one else needs the AUR because there are lots of other, sometimes more extensive, options.
- generate totp from totp key
I have emailed myself the recovery codes and the actual totp key, I also have a bash alias
https://gitlab.com/oath-toolkit/oath-toolkit# for hex key alias GHGEN="oathtool --totp 'totp key here'" # or for base32 key use alias GHGEN="oathtool -b --totp 'totp key here'"
Create a desktop entry of appimage with bash script
#!/bin/bash

# Check if an AppImage file is passed as a parameter
if [ -z "$1" ]; then
    echo "Usage: $0 <AppImage file>"
    exit 1
fi

# Assign the AppImage file path
APPIMAGE_FILE="$1"

# Check if the provided AppImage file exists
if [ ! -f "$APPIMAGE_FILE" ]; then
    echo "Error: File '$APPIMAGE_FILE' not found!"
    exit 1
fi

# Extract the application name (assuming the AppImage filename is the application name)
APP_NAME=$(basename "$APPIMAGE_FILE" .AppImage)

# Create the desktop entry content
DESKTOP_ENTRY="[Desktop Entry]
Name=$APP_NAME
Exec=$APPIMAGE_FILE
Terminal=false
Type=Application
Icon=$APPIMAGE_FILE
Categories=Utility"

# Create the desktop entry filename
DESKTOP_ENTRY_PATH="$HOME/.local/share/applications/$APP_NAME.desktop"

# Create the desktop entry file
echo "$DESKTOP_ENTRY" > "$DESKTOP_ENTRY_PATH"

# Make the desktop entry executable
chmod +x "$DESKTOP_ENTRY_PATH"

echo "Desktop entry for '$APP_NAME' created successfully at '$DESKTOP_ENTRY_PATH'"
xargs
rg --files | rg '.*\.json' | xargs stat
so whatever the output rg --files | rg '.*\.json' these will give stat will take as paameter lien by line so basicially stat first line of output and so on.
xclip clipboard for x11
# to clipboard
xclip -selection clipboard -t image/png -i example.png
# or
# from clipboard
xclip -o -se c -t image/png

# text to variable
fullfilepath=$(xclip -selection clipboard -o)
images to file from clipboard
x11
xclip -selection clipboard -t image/png -o > output.png
and for wayland
install wl-clipboard
and
wl-paste > output.png
for file to clipboard
wl-copy -t image/png < /path/to/your/image.png
native games in linux for native games in linux following 32 but libraries needed to be installed
apt install libgl1:i386 libglx0:i386 libc6:i386 libstdc++6:i386
fix buzzing of sound
- https://youtu.be/Kt0dkXWnaC4 : How To Fix Buzzing Speakers On Linux
Alternative of shred
dd if=/dev/urandom of=/storage/emulated/0/yourfile.txt bs=1M count=1
rm /storage/emulated/0/yourfile.txt
openvpn setup as server
-
Run a popular, pre-made installation script for quick setup:
wget https://git.io/vpn -O openvpn-install.sh && bash openvpn-install.sh. Follow the prompts on screen to set up protocols (UDP recommended), port (1194), and DNS. -
Configure and Connect Client Once installed, the script will generate a .ovpn file (e.g., client.ovpn). Download this file from your VPS to your local computer/phone using SCP or SFTP. Install the OpenVPN Connect client app, import the .ovpn file, and click "Connect".
-
in linux use
sudo openvpn --config client1.ovpnto connect with it
wireguard
curl -O https://raw.githubusercontent.com/angristan/wireguard-install/master/wireguard-install.sh
chmod +x wireguard-install.sh
./wireguard-install.sh
to check status
systemctl status wg-quick@wg0
for bringiing down individual clients from server use
to get list
sudo wg show
for temporarily disable
sudo wg set wg0 peer CLIENT_PUBLIC_KEY remove
or for safer just changed allowed ip
10.66.66.3/32, fd42:42:42::3/128 this was original lets say
so use
sudo wg set wg0 peer CLIENT_PUBLIC_KEY allowed-ips 0.0.0.0/32
then later change back to
sudo wg set wg0 peer CLIENT_PUBLIC_KEY allowed-ips 10.66.66.3/32,fd42:42:42::3/128
for permanent disable
sudo nano /etc/wireguard/wg0.conf
remove or comment out client
PublicKey = CLIENT_PUBLIC_KEY
AllowedIPs = 10.0.0.3/32
then apply changes
sudo wg-quick down wg0
sudo wg-quick up wg0
other config details
IPv4 or IPv6 public address: 198.12.73.213
Public interface: eth0
WireGuard interface name: wg0
Server WireGuard IPv4: 10.66.66.1
Server WireGuard IPv6: fd42:42:42::1
Server WireGuard port [1-65535]: 53586
First DNS resolver to use for the clients: 1.1.1.1
Second DNS resolver to use for the clients (optional): 1.0.0.1

WireGuard uses a parameter called AllowedIPs to determine what is routed over the VPN.
Allowed IPs list for generated clients (leave default to route everything): 0.0.0.0/0,::/0
in client best method is to use wireguard
- download wiregard profiles from https://account.protonvpn.com/downloads
- install wireguard-tools and then copy that conf files to /etc/wireguard
- run
sudo wg-quick up <conf_name>(without .conf at end) - to disconnect sudo wg-quick down <conf_name> Note : in proton config files, it is configured such that browsers cant access it so make changes in conf files like this AllowedIPs = 0.0.0.0/0, ::/0 to allow all network traffic
- for kill switch add above
peersection# Kill switch: block all traffic not going through WireGuard PostUp = iptables -I OUTPUT ! -o %i -m mark ! --mark $(wg show %i fwmark) -m addrtype ! --dst-type LOCAL -j REJECT && ip6tables -I OUTPUT ! -o %i -m mark ! --mark $(wg show %i fwmark) -m addrtype ! --dst-type LOCAL -j REJECT PreDown = iptables -D OUTPUT ! -o %i -m mark ! --mark $(wg show %i fwmark) -m addrtype ! --dst-type LOCAL -j REJECT && ip6tables -D OUTPUT ! -o %i -m mark ! --mark $(wg show %i fwmark) -m addrtype ! --dst-type LOCAL -j REJECT
galv peer
peer: n4S+ao5+VqQRwYcYoHIslRKCgyyMAvUWlSuIOhztlC4=
  preshared key: (hidden)
  allowed ips: 10.66.66.4/32, fd42:42:42::4/128
nmap : nice command to get details of entered domain. scan networks for live hosts, open ports, running services, operating systems, and potential vulnerabilities
flatpak info --show-location io.gitlab.news_flash.NewsFlash
and for user data
~/.var/app
to uninstall unsed packages
flatpak uninstall --unused
to list themes
flatpak list --runtime | grep -i theme
- check what process is precenting system from sleep
dbus-send --print-reply --dest=org.gnome.SessionManager /org/gnome/SessionManager org.gnome.SessionManager.GetInhibitorsthen whatever the inhibtor id is returned use thisdbus-send --print-reply --dest=org.gnome.SessionManager /org/gnome/SessionManager/Inhibitor503 org.gnome.SessionManager.Inhibitor.GetAppId
isolate softwares
- using firejail
--private: will disable access from filesystemfirejail --private firefox "http://dangerous-url.com"for breaking off internetfirejail --net=none --private firefox "https://www.google.com"
get resource usage like cpu and ram of all processes containing the given keyword useful to actually track things properly
for the physical memory
ps axo %cpu,rss,comm | awk '{print $1 "%\t" $2/1024 " MB\t" $3}': Lists CPU percentage, calculates memory in MB (RSS / 1024), and shows the command name.
when printing and using the 1st method it will just print one word so change comm to args and for real full thing use following
ps axo %cpu,rss,args | awk 'NR==1 {print "CPU%\tMEM_MB\tCOMMAND"; next} {printf "%s%%\t%.2f MB\t", $1, $2/1024; for(i=3;i<=NF;i++) printf "%s ", $i; print ""}'
for swap one
for pid in /proc/[0-9]*; do
    pid_num=$(basename $pid)
    swap=$(awk '/^Swap:/ {sum+=$2} END {print sum}' $pid/smaps_rollup 2>/dev/null)
    if [ ! -z "$swap" ] && [ "$swap" -gt 0 ]; then
        name=$(cat $pid/comm 2>/dev/null)
        echo "$swap $pid_num $name"
    fi
done | sort -rn | head -n 10 | awk '{printf "PID: %-6s Swap: %.2f MB  Command: %s\n", $2, $1/1024, $3}'
for printing full command line
for pid in /proc/[0-9]*; do
    pid_num=$(basename $pid)
    swap=$(awk '/^Swap:/ {sum+=$2} END {print sum}' $pid/smaps_rollup 2>/dev/null)
    if [ ! -z "$swap" ] && [ "$swap" -gt 0 ]; then
        # Reads the full command line string and cleans up null characters
        full_cmd=$(tr '\0' ' ' < $pid/cmdline 2>/dev/null)
        # Fallback to short name if cmdline is empty (common for kernel threads)
        if [ -z "$full_cmd" ]; then full_cmd=$(cat $pid/comm 2>/dev/null); fi
        echo "$swap|$pid_num|$full_cmd"
    fi
done | sort -t'|' -k1 -rn | head -n 10 | awk -F'|' '{printf "PID: %-6s Swap: %.2f MB  Command: %s\n", $2, $1/1024, $3}'
and finally a go program which can do this all
main.go
build it by
go build -o procusage main.go and then ./procusage firefox
and the bash version
main1.sh
just use bash main1.sh firefox to run
go code listing all processes if no arguments are given and also tabular form main.go
change swapiness
to check first
cat /proc/sys/vm/swappiness
permanent solution
sudo nano /etc/sysctl.conf and add
vm.swappiness=10 at bottom.
do this to apply change without rebooting: sudo sysctl -p
temporary
sudo sysctl vm.swappiness=10
android logs (crash logs including)
adb logcat

# for only errors
adb logcat *:E
for specific app
adb logcat | grep com.yourcompany.appname