
12 KiB
Installation
https://wiki.archlinux.org/title/installation_guide offline installation : https://medium.com/@elohash/how-to-install-arch-linux-without-internet-no-pacman-9314836949de
https://docs345.surge.sh/arch_installation/
This video is used for the following steps: https://www.youtube.com/watch?v=DPLnBPM4DhI https://files.catbox.moe/u3tkye.mp4
-
iwctl -
https://m.youtube.com/watch?v=3czrHtFHteY
device liststation wlan0 scanthenstation wlan0 get-networksthen connect to internet usingstation <device_name> connect <ssid>Eg:station wlan0 connect Comcast-50andquit. then ping it by to check if internet is workingping x.org. -
Update time with
timedatectl -
Partitioning disk
- Check partition using
fdisk -lorlsblkorcfdisk - Then
fdisk <partition>eg:fdisk /dev/sda-
Type these commands in sequence:
pto print informationoto create new labelnto add new partition. So many prompts will come just press enter to select default. -
Press
tand Choose lvm by typing8Ethen typeato make partition active. -
Finalize change type
wthen enter
-
- Then create physical volume using
pvcreate --dataalignment 1m /dev/sda1 - Now create volume group
vgcreate volgroup0 /dev/sda1. Herevolgroup0is a group name. - Now create 2 logical volumes ie lv_root and lv_home
lvcreate -L 30GB volgroup0 -n lv_rootandlvcreate -l 100%FREE volgroup0 -n lv_home - Load new volume group into memory
modprobe dm_mod - Scan system for volume groups
vgscanand activate itvgchange -ay
- Check partition using
-
Formatting volumes
- Now format these parttions. For root one , format it with ext4 and for swap one format with swap
Ext4 formatting
mkfs.ext4 /dev/volgroup0/lv_rootMountingmount /dev/volgroup0/lv_root /mntNow format 2nd logical volume and mount itmkfs.ext4 /dev/volgroup0/lv_homeMountingmkdir /mnt/homemount /dev/volgroup0/lv_home /mnt/homeIf there r swap partitions then Format the Swap Partition (if created): If you created a swap partition, format it as swap:mkswap /dev/sdX2# Replace /dev/sdX2 with your swap partitionswapon /dev/sdX2# Activate the swap partitionmkdir /mnt/etcSaving partition layout by:genfstab -U -p /mnt >> /mnt/etc/fstab
- Now format these parttions. For root one , format it with ext4 and for swap one format with swap
Ext4 formatting
-
For UEFI Difference here is that we need to create efi partition After typing
fdisk /dev/sdatype these commands:pandg(for new GPT) ,nthen- Partition number and First sector is default but for last sector we need to change it So type
+500Mas 500mb is enough for efi Now typetand and partition type is1which means efi - Now one more partition for rest
So type
nand just select defaults and set the type withtand set to lvm- Partition number would be 2 which is default
- Type
30for lvm
- Finally verify it by
pand typewto make changes For parttion 1 ie efi , it have to be formatted with fat32mkfs.fat -F32 /dev/sda1Here-F32represents fat32 Now instead of creating and volume and setting other steps for lvm use sda2 instead of sda1 .
- Partition number and First sector is default but for last sector we need to change it So type
-
For UEFI with encryption
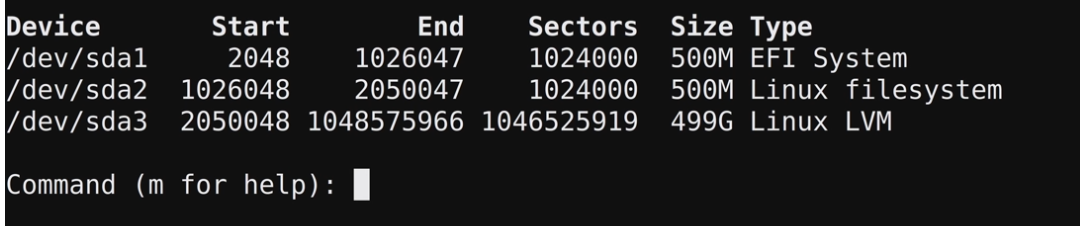 this should be. 1st to efi,2nd to linux filesystem and 3rd to linux lvm
Do same for efi and set ext4 for partition 2 but before formatting 4rd we need to encrypt it
-
Setting encryption
cryptsetup luksFormat /dev/sda3Now u need to type passphrase. This passphrase should be available else all data will remain encrypted and inaccessible. After typing passphrase it will get locked so typecryptsetup open --type luks /dev/sda3 lvmNow just create volume , format and mount
pvcreate --dataalignment 1m /dev/mapper/lvm
-
-
Installing components
-
Using pacstrap command
pacstrap -i /mnt baseThere mey be a error related to keyring hell so to fix it use https://wiki.archlinux.org/title/Pacman/Package_signing#Resetting_all_the_keys In/etc/pacman.confSigLevel = Never #LocalFileSigLevel = Optional #RemoteFileSigLevel = Required -
Configure our installation
arch-chroot /mntUsing in chroot environment. arch-chroot is like a fake-root which change to new directory so that u can make changes af if they r live but all those changes will take place in future.- Inside chroot, install 4 packages ie linux, linux-headers and linux-lts, linux-lts-headers. 2 versions bcz if one dont work then other may work. lts means here 'long term support' hence stable. Use
pacman -S linux linux-headers linux-lts linux-lts-headers linux-firmwareThen few more packages like nano, base-devel(basic development tools), openssh(remote access) To use openssh make sure to enable sshdsystemctl enable sshdInstall packages for network workingpacman -S networkmanager wpa_supplicant wireless_tools netctlinstalling dialog if gui network interface not workingpacman -S dialogThen finally enable NetworkManager so it will be started when bootedsystemctl enable NetworkManagerInstalling lvm supportpacman -S lvm2To ensure boot process support our configuration, we have to modify a config filenano /etc/mkinitcpio.confnow using Ctrl+W find theHOOKSwhich is not commented. Between block and filesystems word, addlvm2. if used encryption then addencrypt lvm2.
- Inside chroot, install 4 packages ie linux, linux-headers and linux-lts, linux-lts-headers. 2 versions bcz if one dont work then other may work. lts means here 'long term support' hence stable. Use
-
-
Resizing partition
lvdisplayandvgdisplayShrink LV If something goes wrong with length of partition then u need to resize itumount /dev/VG_NAME/lv_home# Unmount the LV (replace VG_NAME with your volume group)e2fsck -f /dev/volgroup0/lv_home# to check file system consistency and check for errors,bad block.resize2fs /dev/VG_NAME/lv_home NEW_SIZE# Shrink the filesystemlvreduce -L NEW_SIZE /dev/VG_NAME/lv_home# Shrink the logical volume Extend LVlvextend -L +NEW_SIZE /dev/VG_NAME/lv_root# Extend the logical volume orlvextend -l +100%FREE /dev/VG_NAME/lv_roote2fsck -f /dev/volgroup0/lv_rootresize2fs /dev/VG_NAME/lv_root# Resize the filesystem to use the new space -
Initramfs To take all these setups and option take effect use this
mkinitcpio -p linuxmkinitcpio -p linux-lts(As this was also installed) Then set the locale bynano /etc/locale.genThen choose en us and uncomment itlocale-genUpdating passwordpasswdthen type password to set it Creating standard useruseradd -m -g users -G wheel hvm-mmeans creating home directory for the user,-grepresents initial login group,-Gare other supplementary groups.hvmis user name. Then set password for this userpasswd hvmand set password. After this we dont have to use root account always, instead we can use sudo Now we need to associate wheel group with sudoEDITOR=nano visudovisudois a dedicated command to modify sudo priviledges Scroll down and search for%wheel ALL=(ALL:ALL) ALLand uncomment it and save the file. Now user can use sudo to run administrative task. -
Installing GRUB Its purpose is to boot the OS without bootable media like USB or CD.
- For non-UEFI(BIOS)
Install this:
pacman -S grub dosfstools os-prober mtoolsand finallygrub-install --target=i386-pc --recheck /dev/sda - For UEFI install these
pacman -S grub efibootmgr dosfstools os-prober mtoolsmkdir /boot/EFImount /dev/sda1 /boot/EFIand finallygrub-install --target=x86_64-efi --bootloader-id=grub_uefi --recheckCheck if grub exists by this:ls -l /boot/grub- Others
cp /usr/share/locale/en\@quot/LC_MESSAGES/grub.mo /boot/grub/locale/en.mo- With encryption
nano /etc.default/grubthen uncommentGRUB_ENABLE_CRYPTODISK=yand edit the line #add this GRUB_CMDLINE_LINUX_DEFAULT="cryptodevice=/dev/sda3:volgroup0:allow-discards loglevel=3 quiet"
- With encryption
- Others
- Generate grub config file
grub-mkconfig -o /boot/grub/grub.cfgFinallyexitandumount -a(to unmount everything) Finallyreboot
- For non-UEFI(BIOS)
Install this:
Post install tweeks
-
Creating swap file(not partition)
sucd /rootThe dd command in Linux is a versatile utility used for copying and converting files, including data from files, devices, partitions, or even raw disk images. The command's name, "dd," stands for "data duplicator."dd if=/dev/zero of=/swapfile bs=1M count=1024 status=progressChanging permissions of swapfilechmod 600 /swapfileFormatting it to swapmkswap /swapfileBacking up copy of fstab file as we going to edit itcp /etc/fstab /etc/fstab.bakEditing itecho '/swapfile none swap sw 0 0' | tee -a /etc/fstabIt will add the linefree -mto check is swap is theremount -a(if it runs means no error)To activate swap
swapon -aand check it withfree -m-
Setting time zone Listing it
timedatectl list-timezonesSetting ittimedatectl set-timezone <from_list>Enabling itsystemctl enable systemd-timesyncdSetting host namehostnamectl set-hostname archhosthere 'archhost' is host name Editing hosts filenano /etc/hostsand add127.0.0.1 localhost 127.0.1.1 archhostand save it To check it
hostnamectlThis image will be the output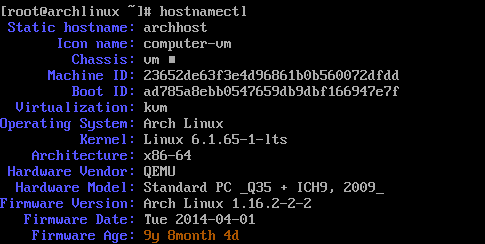 Installing micro code for CPU(optional)
AMD CPU
pacman -S amd-ucodeor Intel CPUpacman -S intel-ucode
-
-
GUI
- Installing xorg
pacman -S xorg-server - Installing video driver
For Intel or AMD GPU
pacman -S mesaFor NVIDIA GPUpacman -S nvidia-lts nvidiaFor VBoxpacman -S virtualbox-guest-utils xf86-video-vmwareand enable vbox extensionsystemctl enable vboxserviceFor QEMU, this might improve performancesudo pacman -S xf86-video-qxlAnd configure it toosudo mkdir -p /etc/X11/xorg.conf.dsudo nano /etc/X11/xorg.conf.d/20-qxl.confType this
and save itSection "Device" Identifier "qxl" Driver "qxl" Option "AccelMethod" "glamor" EndSection
- Installing xorg
-
Installing Desktop Environment
- GNOME
pacman -S GNOMEit will store many dependencies as its a package group Some other optionalpacman -S gnome-tweaksthis will give more control over the environment Enable display managersystemctl enable gdmThis will enable login screen Specify the language in Region and Language section else terminal wont open - Plasma
pacman -S plasma-meta kde-applicationsEnable display managersystemctl enable sddm
- GNOME
-
Xfce
pacman -S xfce4 xfce4-goodiesInstall display managerpacman -S lightdm lightdm-gtk-greeterEnabling itsystemctl enable lightdm -
- Packages in xfce
- There are 15 members in group xfce4: :: Repository extra
	   1) exo  2) garcon  3) thunar  4) thunar-volman  5) tumbler
	   6) xfce4-appfinder  7) xfce4-panel  8) xfce4-power-manager  9) xfce4-session
	   10) xfce4-settings  11) xfce4-terminal  12) xfconf  13) xfdesktop  14) xfwm4
	   15) xfwm4-themes
	Enter a selection (default=all):
	:: There are 36 members in group xfce4-goodies:
	:: Repository extra

	   1) mousepad  2) parole  3) ristretto  4) thunar-archive-plugin
	   5) thunar-media-tags-plugin  6) xfburn  7) xfce4-artwork
	   8) xfce4-battery-plugin  9) xfce4-clipman-plugin  10) xfce4-cpufreq-plugin
	   11) xfce4-cpugraph-plugin  12) xfce4-dict  13) xfce4-diskperf-plugin
	   14) xfce4-eyes-plugin  15) xfce4-fsguard-plugin  16) xfce4-genmon-plugin
	   17) xfce4-mailwatch-plugin  18) xfce4-mount-plugin  19) xfce4-mpc-plugin
	   20) xfce4-netload-plugin  21) xfce4-notes-plugin  22) xfce4-notifyd
	   23) xfce4-pulseaudio-plugin  24) xfce4-screensaver  25) xfce4-screenshooter
	   26) xfce4-sensors-plugin  27) xfce4-smartbookmark-plugin
	   28) xfce4-systemload-plugin  29) xfce4-taskmanager
	   30) xfce4-time-out-plugin  31) xfce4-timer-plugin  32) xfce4-verve-plugin
	   33) xfce4-wavelan-plugin  34) xfce4-weather-plugin
	   35) xfce4-whiskermenu-plugin  36) xfce4-xkb-plugin
as